Pages
▼
Tuesday, September 25, 2012
Ruffle and Tulle Double Skirt
A girl in my church fell in love with this purple ruffle and tulle skirt. The problem was that it was way too short for a 12 year old to wear modestly. To solve the problem, her mom bought two of them (thankfully, they were on the clearance rack!), and then asked me if I could sew them together. Of course I can! Although, it was much more difficult than I thought. I had to seam rip A LOT! I first took off the elastic at the back, then the entire waste band, then there was some gathered stitching holding all the tulle layers together, and finally, I had to take off a ruffle that was underneath the top skirt so that it wouldn't be quite so puffy in the middle. After the skirts were pinned together, it still looked too much like two skirts pinned together. My ultimate solution was to raise the bottom skirt up about 3 inches so the bottom ruffle section is shorter than the top. I was still unsure when I gave it to the mom, but I was informed that the girl loved it. So, I guess it's perfect after all. But I'm not sure I would agree to work on a skirt like this again...
Wednesday, September 19, 2012
Child Training Bible
This is the best child training tool I have ever come across. It's a Child Training Bible. The set of cards only costs $9, but then you need to buy the flags and highlighters. I ordered mine on Amazon, it was the only place I could find a red highlighter. The set comes with 4 cards. The first one you tape into the front of your bible, and the other ones are stored in the back. Each card has categories like anger, laziness, tattling, etc., along with several scriptures that deal with that topic. You highlight each scripture and mark it with a flag so that you can find it quickly. The back of the cards also have questions you can ask your child and a prayer. It is amazing to go right to God's Word when dealing with situations that come up. We have done a bible study on anger, complaining, and fighting so far. I highly recommend this Child Training Bible!
As a fun get together, a couple friends came over after we ordered these and we had a highlighting party! There is a slight discount for orders of 10 or more!
Monday, September 17, 2012
Decorate Your Own Dishes (Mother's Day Gift)
Yes, you read that right. It says Mother's Day Gift... I forgot to take a picture of these back in May, but I was able to snap a picture last week when we were visiting. I found the idea on Pinterest. I bought simple white plates from the dollar store and then used a porcelain pen to write on them. After they dry for a day, you bake them in the oven and they are done! I had to buy the pen online at amazon.
Both Caleb and Rebekah wrote themselves. Yes, Rebekah actually wrote her R upside down!
Tracing Joshua's hand was a little more difficult!
And my hand was too big, so a simple heart looked nice. I know Mother's Day is a long time away, but these would make some nice Christmas gifts!
Friday, September 14, 2012
Days 19-25, My Father's World 1st Grade
This was the coolest science experiment! It's on day 25 of My Father's World 1st grade. We made a rain cloud! I expected that the experiment was just to show how the steam would condense on the bottom of the pan (with ice in it), but even I was amazed when the cloud started forming! We also saw the condensation and then it "rained". One thing to note though: use a metal pan with ice in it above the boiling water. I started with a plastic bowl, but then my hand was getting too hot from the steam. The cloud never formed and it barely had condensation on it. I'm sure the plastic didn't get as cold as the metal pan did.
Math has been going well this week. Above is a picture of our bean sticks, which are used to show place value. We add a bean every day to a cup, and then glue them onto a stick when we have 10. Below is a picture of monster math! I read an idea on the MFW Boards. It's a little hard to see, but we drew 3 monsters, one with 2 feet, one with 5 feet, and one with 10 feet. Then I told a story: There were 3 monsters that lived in the land. Their favorite food was pizza, but they could only get to the pizza by making 50 footprints. How many hops did each monster have to take to get to the pizza? Which one got there the fastest? The slowest? Then we talked about counting by twos, fives, and tens. Finished by some PE, jumping on the monsters footprints to get to the pizza ourselves! Fun!
Our pattern animal blocks went much better this week. No crying because they didn't stay on the lines perfectly! After making the animals, we sorted the blocks used by color, and then but the piles in order by how many of each we had. Our math topics were numbers, and then comparing sizes.
This is our pleasant word jar. I don't remember if this idea came from the MFW message boards, or the facebook group I belong too, but it was a great idea! We learned Proverbs 16:24, which is "Pleasant words are like honeycomb, sweet to the soul and healing to the bones". We compared honey to garbage, and talked about our words being like either. To encourage pleasant words, I put this jar out. Every time someone says pleasant words, they get to put a colored straw in the jar. I have been told I'm sweet several times each day since putting the jar out!
Reading has been going great these last few days! We have learned all the long vowel sounds now, and also /ay/. I'm amazed at how quickly Caleb understands, as long as he's in the mood for it. Above is a little book he read, then wrote and illustrated. He read it to daddy and soaked up the praises!
We started playing a lot of reading games to get extra practice. I have some plain number or alphabet cards that Rebekah uses instead of reading cards. The games go well until someone isn't winning, and then we have a lot of crying... Above, Caleb had to read a word and then use a spoon to carry it across the room and dump it in a pan. Below is Chutes and Ladders with a new rule, you must read a card before you can spin.
This has been the best game. I just used a manilla folder and drew a road on it. I happened to have some construction stickers, so I decorated it. Caleb was so eager to play it! They played it before bed time instead of during school time! They just read a card and get to move ahead one space. They both get there at the same time, so there is no crying about not winning at least!
Lastly, this was our art for the week. We did the abstract warmup level 1, from the book Drawing With Children.
And that's our week!
Wednesday, September 12, 2012
Pretty, Pretty, Princess Dress and Crown
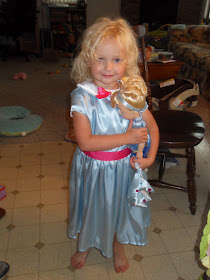
Here is my beautiful birthday princess! I made this princess play dress and crown for her, and she has worn it everyday since, which makes me feel good. I was given this blue fabric, which had previously been used as a table decoration at a baby shower. The skirt part of the dress is just a huge rectangle gathered at the top. I wanted it to twirl around her when she spun in circles! For the bodice, I followed a pattern that I had on hand. And the back closes with two pink buttons. The only thing I had to buy was the pink ribbon to tie around the middle: total cost was $2! And the nice thing about making a play dress is that it doesn't matter if you make a mistake and don't have everything perfect!
She also received a baby princess doll, that just happened to have a blue dress on it, with a pink bow! Thanks Melissa, she loves it!!!
Every princess needs a crown! I really just made this up as I went! I actually stuffed the crown with yarn because I didn't have any stuffing, and it had to get done before her birthday! The back of the crown is just a long tube with elastic in it, so it will fit her for a long time. I happened to have some jewels that I could hot glue on to make it sparkly!
Happy Birthday Rebekah!
Linking with:
Monday, September 10, 2012
Pink Pony Birthday Cake
My Rebekah is 4! She requested a pink pony cake, and this is what she got! I saw a picture of a similar one on Pinterest, but was unable to find the original website to link to. I started with one 12 inch round yellow cake and one 8 inch round strawberry cake. The picture below shows how I cut the pieces to make the pony. I drew the head on a piece of paper and then cut it out with a serrated knife. The hair on the pony was made with the basket weaving tip. Rebekah thought it was perfect!
Friday, September 7, 2012
Vacation Scrapbook Pages
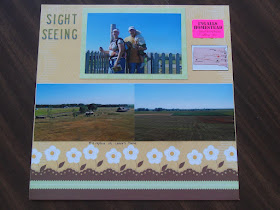
This past weekend I was able to visit my friend Melissa and do some scrapbooking with her. It was so nice to have a day to spend chatting and crafting, thanks again Melissa! I finished 13 pages! I'm not showing a few of them due to personal information on them, but here's a bunch. I bought some divider pages so I could just put a lot of pictures in with minimal effort, and I really like how they turned out. I was disappointed that 3 of the slots are vertical though, since most of my pictures are horizontal, but I was able to trim some and fit them in.


