Pages

Friday, December 31, 2010

Goodbye 2010, Hello 2011

As we approach the new year, I can't help but reflect on 2010, which had tremendous ups and downs, many blessings, and many learning opportunities.  I even learned to knit!  This blog started in May of this year, thank you to everyone that takes time to read it and share comments.  I have been blown away by how this blog has grown, from under 100 page views in July to 500 this month!  People from all over the world have checked in here, especially from the Netherlands and Canada!  Here are the top 5 most viewed blog posts of this year:

1.  Christmas Joys
2.  Thanksgiving Outfit, Corduroy Skirt
3.  Bulletin Board find at Target
4.  Children's Fleece Pajama Pants
5.  My First Post

My personal favorite post this year was the Baby Gift Set for Auction Completed.  I just loved the under the sea theme for the set, and I loved that it was going for a good cause.  Unfortunately, baby Clara is no longer with us.  I pray that her loving family and friends can find joy and peace in the new year to come.


Here's a sneak peak into 2011.  I have started cutting squares to make a denim rag quilt.  The top will be denim, and the bottom will be this flannel.  I'm excited to see the finished product.  I am also planning on making some pillow cases and throw pillows, and maybe some other room decorations!  I have so many ideas for other projects too, so keep reading in this next year!  I pray for blessings for all of you in 2011!

Wednesday, December 29, 2010

Hair bows!


I love making hair bows for little girls!  Hair bows are something that I would never spend a lot of money on, but I can make as many as I want when I do them myself.  It's especially fun to have a friend to make them with so you can swap ribbons!  You only need 1-2 feet of ribbon, or less, depending on the size of your bow, so swapping is great since most ribbons come on spools that can be several feet long.  The base of the bow is a metal double prong clip, found at Sally Beauty Supply, $5.39 for a box of 100.  I like the instructions on this website: Girly Things.  Youtube is also a good place to find instructions!  I made all ten of these bows in 2 hours.  My favorite is the big stripped pink and orange one!

Monday, December 27, 2010

Camouflage Tag Blankets and an Appliqued Onesie


These tag blankets were gifts for two babies to be this Christmas.  Both sets of parents love hunting, so they were a great hit.  This onesie was the first time I've tried applique, and it was a little tricky.  My "T" is a little crooked, but I figured once a baby was wearing it, it'd be hard to tell.  I think I'll try to do some more onesies, but I'll have to get some iron on adhesive first!

Friday, December 24, 2010

Pine Cone Christmas Tree Ornament (Kids Project)


Caleb and Rebekah had a great time making these ornaments.  They painted the pine cones green (and some red), and then sprinkled colored glitter all over them while the paint was still wet.  I used a hot glue gun to adhere a yellow bow and the red ribbon hanger.  A variation could be gluing gems to the pine cone or adding a star to the top instead of a bow.  They were really easy and they look great on the tree!

Thursday, December 23, 2010

Women's Knitted Poncho


Here I am modeling a poncho I knitted for my mom.  She is a little smaller than me, so it will probably fall a little better on her, and she'll probably wear a more flattering shirt underneath it!  The pattern came from Teen Knitting Club.  It is just a simple rectangle, knitted in the stockinette stitch, 20 inches by 45 inches and then folded in half and sewn together on one side (leaving a hole for your head).   The yarn is Homespun, 381 barley color.  I use 1 1/2 skeins. 

Wednesday, December 22, 2010

Christmas Joys

Merry Christmas!


Today we celebrated Christmas with just our immediate family, it was a wonderful day!  After breakfast we read the Christmas story about baby Jesus, such a precious time with our little ones.  Then we opened presents, I got an ipod touch! (Kevin got it at his works' white elephant gift exchange, so it was free)  The kids each got their pajama pants and matching pillow cases, an outfit, and a pair of footie pajamas.  Kevin got socks, underwear, T-shirts, candy, and the game Cir-kis.  We don't go too fancy because we know the kids will be spoiled rotten with toys by the grandparents and other family in the next couple days.  Kevin and the kids played in the snow, then we all made chocolate covered pretzels, peanuts, cereal, and peanut butter crackers, yum!  Tonight we made our gingerbread houses, they turned out great and it was a lot of fun!  The kids had a great time, although they did eat their weight in sugar!!! 


I am so thankful for my family, they mean so much to me!  But I am most thankful this season for the precious baby born in a manger so long ago.  Without Jesus we'd have no hope of heaven, no love, no goodness, no beauty, no salvation.  Let's not forget the price that Jesus paid for us, thank you Jesus!

Tuesday, December 21, 2010

Fleece Pillow Cases


These fleece pillow cases were SO easy to make!  I just folded my fleece in half, and then laid a standard sized pillow case on top.  I cut it out with an inch seam allowance on each side.  Then you just sew up the sides and hem the opening.  Finished!

Sugar Cookies and Gingerbread Houses


I had a Christmas cookie decorating party for the kids.  I invited five other moms and their children to come over and decorate cookies.  This is what they made!  The sugar cookie recipe is below.  Here is a tip that I have learned, I always set my oven at 325 when baking, and I bake items for much less than the time stated in the recipe.  In this case, I did 325 for 4 min, 5 min for bigger cookies.  This way the cookies do not brown and become hard and crunchy. 

I am also planning on making gingerbread houses with the kids tomorrow.  We did it last year, and I decided to make it a tradition, it was so fun.  Here is the recipe and directions for that: gingerbread houses.  I will post some pictures after our festivities tomorrow!

Sugar Cookie Cutouts (from Better Homes and Gardens Biggest Book of Cookies)
2/3 cup butter, softened
3/4 cup sugar
1 tsp baking powder
1/4 tsp salt
1 egg
1 Tbsp milk
1 tsp vanilla
2 cups all-purpose flour
1 recipe for Powdered Sugar Icing

1.  In a large mixing bowl beat butter with and electric mixer on medium to high speed for 30 sec.  Add sugar, baking powder, and salt.  Beat until combined, scraping sides of bowl occasionally.  Beat in egg, milk and vanilla until combined.  Beat in as much of the flour as you canwith the mixer.  Stir in any remaining flour with a wooden spoon.  Divide dough in half.  If necessary, cover and chill dough about 30 min or until easy to handle.
2.  On a lightly floured surface, roll half of the dough at a time until 1/8 inch thick.  Using a floured 2 1/2 inch cookie cutter, cut into desired shapes.  Place 1 inch apart on an ungreased cookie sheet.
3.  Bake at 375 fro 7-8 min or until edges are firm and bottoms are very lightly browned.  Transfer cookies to a wire rack to cool.  Frost with Powdered Sugar Icing. 


Powdered Sugar Icing
In a bowl combine 3 cups sifted powdered sugar, 3 tablespoons milk or orange juice, and 1 teaspoon vanilla.  Stir in additional milk or juice, 1 tsp at a time to make drizzling consistency. 

Sunday, December 19, 2010

More Little Girl Skirts


The leopard print skirt is for my daughter Rebekah, and was a nightmare!  It's made out of a stretchy velvet material, that curled up after I ripped the seam out.  The tag says it's Children's Place Stretch, 76% cotton, 20% polyester, and 4% spandex.  I had to sew up at least 7 holes after I finished it because I didn't realize it had rolled under so far.  I opted to sew a ribbon on the bottom instead of hemming due to the rolling.  I wasn't expecting it to become curly, but I think it still looks good.  The rest of the skirts are headed to my niece!  I have been really busy with the almost Christmas crunch, so keep checking back for new projects!


Saturday, December 18, 2010

Little Girl Gifts - Poncho and Skirts


My second little girl poncho turned out a little different.  Again, my rectangles turned out to be parallelograms.  It was impossible to sew them together so they would make a triangular poncho, but I like this shape just as much.  I hope my niece will love it, her favorite color is purple!

The skirts are for my other niece.  I am actually making her a total of 5, they were pants that she outgrew in length, but still fit around the waist.  The purple butterfly embroidery was actually the bottom of the pant leg.  I used one leg to fill in the middle of the skirt, and added a butterfly from the other leg to the front hip.  I also added a butterfly to one of the back pockets, which I adhered with Steam-A-Seam instead of sewing the pocket closed.  I think they both turned out really cute!  Stay tuned for 3 more skirts and hair bows!


Sunday, December 12, 2010

Mending and Knitting - Snow Day


Snow Day!  This is what I did today during the blizzard, lots of mending for my mother in law.  I was able to fix 10 things for her, which means I only have 4 left, but those are not the fun ones.  Have I ever mentioned that I hate to sew buttons!  If anyone has any tips and trick for doing this, I would much appreciate it!  It's not that I don't know how to sew on a button, it's just that it needs to be done by hand, and I was trying not to sew them on too tight so that you can still button it, which made it difficult.  Anyway, I've also been doing a lot of knitting lately.  Can you guess what these will become?


Today's Simple Joys: 


Wednesday, December 8, 2010

Blueberry Cheesecake Dessert

Blueberry Cheesecake Dessert
2 cups graham cracker crumbs
1 1/2 cups sugar, divided
half stick of butter, softened
1/4 cup milk
4 cups whipped topping
8 oz cream cheese, softened
2 cups powder sugar
4 Tbsp corn starch
2 cups water
1 qt. blueberries

1.  Mix graham cracker crumbs, 1/2 cup sugar, and butter.  Pat into greased 9 x 13 pan.
2.  Beat cream cheese and milk until smooth.
3.  Fold in whipped topping and powdered sugar.
4.  Spoon over crumbs and refrigerate until ready for topping.
5.  In saucepan, mix 1 cup sugar and cornstarch.  Stir in water until smooth, then stir in berries.
6.  Cook until thickened, stirring often.
7.  Cool blueberry mixture until room temperature, spoon over dessert.
8.  Refrigerate until chilled.
9.  Cut into bars and serve.

I first made this dessert for a church party, and it was a huge success.  It helps to make sure that the cream cheese is soft, otherwise it will be a little chunky.  I don't remember where this recipe came from, it was in my cookbook on a hand written note.  If you'd prefer to buy graham cracker pie crusts already made, the filling is enough to fill two crusts.  I hope you enjoy it!

Friday, December 3, 2010

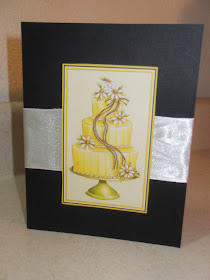
Wedding Card


Congratulations to my good friend Melissa and her soon to be husband David!  They are getting married tomorrow and I am so excited to share their special day.  Here's the card I made for them.

Thursday, December 2, 2010

Children's Fleece Pajama Pants


Who doesn't love fleece pajama pants?  These are going to be Christmas gifts for my children, although, I may have to make myself a pair too!  I may try to make them matching shirts, and probably a pillow case too.  I didn't use a pattern, I used a currently fitting pair of jogging pants as a template.  This is what I did:

Trace only one leg of the jogging pants onto your fleece.  Make sure you go all the way to the crotch area, and the top.  You'll have to draw a straight line from the middle of the crotch to the middle of the top waist.  Add 1/2 inch seam allowance.

Cut out 4 pieces.  If your fleece is not the same on both sides, two of your pieces should be mirrored.

Sew the outside of the pant leg together, then the inside of the pants part.  Do not sew from the crotch to the top waist.  Pin the two legs together so that both crotch seams are together, then sew.  Be very careful here! 

Hem both legs.  Here the picture shows everything finished except the waistband.  Fold down the top 1/4 in larger than your elastic.  I used 3/4 in elastic.  Sew around the hem, leaving 2 inches not sewn.  Use a large safety pin to thread your elastic through the waist.  Sew the elastic together, overlapping an inch, using a zig zag stitch.  Close the hole with a straight stitch, and you are finished!