Monday, January 30, 2012

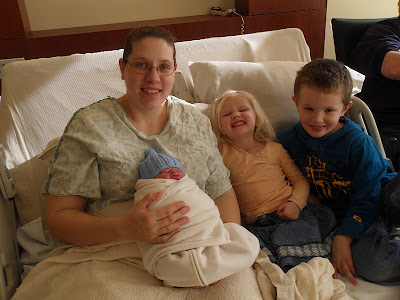
Welcome Baby Joshua


I'd like you to meet our newest addition, Joshua!  He was a big guy, 8 lbs 8 oz and 21 1/4 inches long!  Isn't he precious?  It's amazing how fast you can love a new little one.  We're thanking God for our miracle baby, may he grow up strong and healthy, always knowing the love of God!  


 Caleb and Rebekah are thrilled with their new brother too!


You'll have to forgive me if my posts slow down for a few weeks as I get adjusted to the new baby.  I do still have a few projects on my mind though...


Sunday, January 29, 2012

Individual Serving of Microwave Brownie Torte


I came across this recipe for an Individual serving size, microwaveable brownie torte, and it is heavenly!  It's from Remodelaholic.  Thank you so much for the recipe!  I have tried it 3 times now, and I love it.  This last time, I ran out of cocoa powder, so I used a square of unsweetened baking chocolate, still amazing!  Try it!

Friday, January 27, 2012

Changing Table Pad


I remember how often little boys pee when you take off their diaper!  I made this cute little pad to put on the changing table, so at least I won't have to change the changing pad cover as often (I only have 2 covers).  It is flannel on one side, and vinyl covered cotton on the other side.  I've never tested iron on vinyl in the washing machine, so I'm hoping it'll be okay!  I plan on air drying it though.


I made it 15 x 20 inches, and used iron on vinyl to cover the green polka dotted cotton fabric.  Just sew around the edges with right sides together, turn, and top stitch around the entire thing closing the opening!


I was planning on making two, but I ran out of vinyl...

Thursday, January 26, 2012

Crocheted Newborn Baby Hat


What do you do when your feet are swollen and you can't sit at the computer anymore?  You sit on the couch with your feet up crocheting a baby hat!  I just did a simple double crochet and made a rectangle.  I sewed up the edge, and then cinched the top.  Easy!  I considered adding a pom pom on top, but decided not to.

Wednesday, January 25, 2012

Business Card Wallet


I finally decide to make myself business cards to promote my blog!  I've had several people ask me about how I make things, especially at church!  The other day I had to write my blog address on a napkin for someone!  I used Microsoft Publisher, and just printed off about 20 of them.  Of course, I needed a cute little wallet to hold them in!  I found a tutorial online here, but I didn't use it when I went to make mine.  Afterwards, I noticed that she used some fusible fleece inside, and I wish I would have done that.


Supplies:
Outer fabric 5 x 6
Inner fabric 5 x 6
Pocket fabric 2 pieces, 2 1/2 x 5
A button
A hair elastic (mine was all stretched out!)


First, hem one long edge of each pocket piece.


Pin the pocket pieces to the inner fabric piece, with the hemmed edges to the inside.


Sew the button on the right side of the outer fabric piece.  It's about 1 1/2 inches from the edge, centered.


Pin your elastic to the pocket piece.  When sewing, I pinched the end together as I went over it and back stitched to secure it really well.


Put the outer fabric piece on top of the inner fabric piece, right sides together and sew around the edge.  I had a little more than a 1/4 inch seam allowance.  You can see I left a small opening for turning.  Then, cut the end of the hair elastic off.


Turn and press.  Then top stitch around the entire thing, making sure you close your opening.


Finished!


Tuesday, January 24, 2012

Sharing a Bedroom


Rebekah is officially moved into Caleb's room!  I need to stop calling it Caleb's room!  Right now, they are both thrilled to be in the same room.  Rebekah loves sleeping on the big bed (she was in a toddler bed still). We moved a toy box to the basement, but otherwise everything fit perfectly.  There's even extra room in the closet!  They have yet to actually sleep during a nap time though...


See the lower bar in the closet that Rebekah's clothes are hanging on?  That is the best thing in the world!  Having all her shirts and skirts hanging low means that she can pick out her clothes and get dressed herself, as in, without my help!!!  Sometimes she picks out some crazy combinations, but that's okay with me!  Only her church clothes and a few out of season outfits are hanging on the top bar. 


Do your kids share a room?  How does it work out in your family?

Monday, January 23, 2012

Nursing Cover and Matching Burp Clothes


Another nursing cover made as a baby gift!  This fabric was picked out by the mom to be, and I think she made a great choice!   To make your own, see my first post about nursing covers here


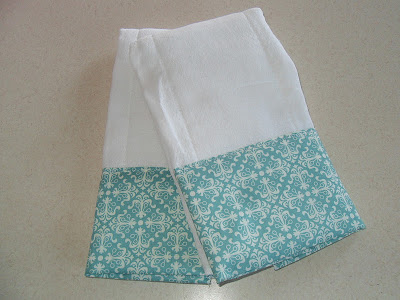
I had enough fabric left over to make two matching burp clothes too!  See this post for more information about decorative burp clothes.


Linking up with Keeping it Simple today.  Go check out over 300 projects!

Friday, January 20, 2012

Lined Fabric Bucket


Isn't this an adorable fabric bucket?  It's going to go on the changing table in the baby's room to hold some diaper supplies.  I followed a tutorial by Inspired by Family Magazine.  I used a bowl to make the circle for the bottom, and then measured the circumference to figure out the length of the side.  I already had some rip away interfacing, so I used that to make it stiffer, being careful not to rip it!  I think it worked great! 


I may make a smaller one, or maybe a square one after I figure out how to organize the changing table. We're a little behind on getting the baby's room set up, we still haven't moved Rebekah out of the room and into her brothers!  This weekends project is moving her and putting up the crib... only 10 days to my due date!


Thursday, January 19, 2012

Hh Horse Homeschool Highlights in MFW


This week we learned about Hh horses!  Both kids really enjoyed this unit.  Our bible words were "I obey right away", we're still working on following them!   My husband found this puzzle at the thrift store, and we worked on it as a family.  Caleb's definitely not quite ready for such a large puzzle, but it was cute watching him get excited when he found a piece that fit.  We also made toilet paper tube horses, found at DLTK. 


Since we didn't have a horse farm to go visit, we stayed home and watched the movie Misty.  You can find in on youtube.com like we did.  Then I was pleasantly surprised to find that two of our library books were about the horses that live on Assateague Island in Virginia, I never realized it was a true story while watching the movie.  The kids were thrilled!


We read a few more books, but I took the rest back to the library before I took a picture.  Our lap books are a little bare, I'll have to glue pictures of our puzzle and toilet paper horses into the blank spot.  I also had them obey my commands as I let them to a treasure (hard salami in a bathroom drawer), which they thought was great, and begged me to do again!


Caleb is really improving his drawing too, as in, he actually attempts to draw something other than scribbles!  I love his horse on the bottom of the picture (I had to draw the hat though).  The big and little h folders came from homeschool share

Wednesday, January 18, 2012

Fabric Covered Wipes Case


This started as just your standard boring plastic travel sized wipes case.  But now it's adorable and fun, and it matches my diaper bag and accessories!  I used another great tutorial from Make It & Love It.  I didn't intend on the black ribbon stripes, but my hot glue showed through the green cotton fabric, so I had to add something to cover it up.  I think it turned out great, I can't wait to start using all the stuff I've been making!  Our baby boy will hopefully be here in less than 2 weeks!


The inside isn't pretty, but it'll be covered with wipes and no one will ever see!  I didn't take a picture of the bottom, but it is just plain black.

A fabric covered wipes case would make a great baby gift for someone, especially paired with a package of wipes and diapers!  And don't worry if you can't sew, only hot glue is used!


Tuesday, January 17, 2012

Pacifier Clips with Fabric Yo-yo


Ahh, cute pacifier clips!   I think Rebekah had the ugly dollar store variety, so when I saw this tutorial on Make It & Love It I had to make a couple.  I did not have any cute buttons to use, so I made a fabric yo-yo instead.  It was my first time making them, and I will definitely be making more!  What a great embellishment!  I followed the tutorial here, which was very easy to follow.  One tip I have for you though is to sew close to the folded edge, not the raw edge, otherwise it doesn't gather nicely. 


As an added bonus, I was able to make both of these without spending anything!  I just happened to have the same badge clips that Ashley recommended from Walmart.  I bought a box of them for homeschooling and only used 2 for my kids!


I did have to use velcro on the end of the ribbon instead of snaps, I need to look into getting a snap press, it'd come in handy.  I ended up hand sewing the velcro on, which was a little tricky, but it looked much better than what the machine did!

Monday, January 16, 2012

Homemade Bread from Scratch


Gotta love the smell of homemade bread baking!  I decided it would be fun to learn how to bake bread from scratch.  I have a bread machine, which I love, but I wanted to try to make bread that would be good for sandwiches.  Homemade bread is usually denser and crumblier, which isn't always good for a sandwich.  I found this recipe from Moonberry Farm.  I love that Julie titles it Our Daily Bread!  The taste is great, so I've been trying to tweak what I've been doing to make it rise better.  This weekend was my best attempt yet (of 3)! 


I was hoping that it would rise higher to be a taller loaf!  The first time I think my yeast was too old and it didn't rise much at all.  So, the second time I used a new jar of yeast and it rose great in the bowl, but after I punched it down and put it in the pans, it barely rose at all.  Because Julie mentioned in the recipe that she skips that step if she's rushed, I thought I'd skip it too and just put the bread in the pans right away to rise.  The loaves rounded on top, just above the edges of the pans, but somehow shrank some when I baked it...  So, anyone have any tips for me?

Our house temperature is about 65 degrees, but I let the loaves rise on top of the stove while the oven was on, so they were warmer.  Could the temperature be the culprit?


It did make a great pizza crust though!  I let the dough rise for about 20 minutes and then baked it right away.  After it cooled I wrapped it and threw it in the fridge.  Sunday after church it was quick and easy to add our toppings and pop it in the oven until the cheese melted.  Yum, I love pizza!

Linking up with Motivate Me Monday at Keeping It Simple!

Friday, January 13, 2012

Baby Boy Scrapbook - Getting Ready


We're busy getting ready for our baby boy!  The car seat came in the mail a few days ago, the kids were so excited!  Rebekah's baby Mollie had to take a ride!  Last night I spent quite a bit of time making a baby book.  I bought everything a few months ago, but just now got to it.  I am pre-making most of the pages, so I only have to enter in the info and add pictures.  I also did this with Rebekah's book, and it made it much easier to keep up with.  If you're not having a baby of your own, a pre-made baby book makes a wonderful baby shower gift!  A friend of mine gave me one for Caleb, and I loved it!


Want to make one?  Here are my blank pdf files for you:

Baby Book
Family Tree Baby Book
MY FIRSTS
Baby Book Growth and Favorites

I already filled out a lot of the personal information, so I had to cover up some of it when I took the pictures...  I used my Cricut to cut out all the words for my titles, the Plantin cartridge.


Related Posts Plugin for WordPress, Blogger...