Monday, July 29, 2013
Our Homeschool Space 2013-2014
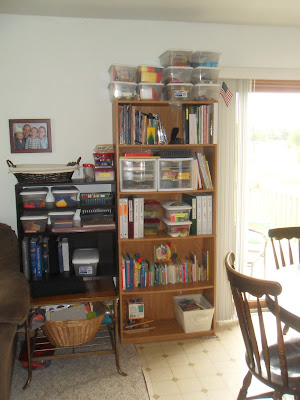
Here's our homeschool space for this year, 2013-2014! It's expanded a bit since last year. I added a cube book shelf on top of the end table, which gave me a bit more storage space, and kept stuff out of Joshua's reach! Most of the clear plastic shoe boxes are busy boxes to keep Joshua entertained when I need to be teaching the others. I hope they work! We are using My Father's World Adventures in US History (2nd Grade) and Kindergarten this year. Some of the preschool toys in Joshua's busy boxes are from My Father's World also.
The top shelf of the big bookcase holds all the books and CDs that we won't be using every day, as well as our art curriculum and student sheets for MFW. The second shelf holds all the daily teachers manuals and workbooks, as well as Kindergarten stuff, stickers and paper in the drawers and on top. The third shelf down holds their school boxes, some extra supplies, and all their binders. The binders are for their completed work: one for a history notebook, one for art, one is a nature journal, and one for everything else. Rebekah also has a calendar notebook. The bottom two shelves are for Joshua.
On top of the cube shelf is our book basket, scripture memory box, and Rebekah's number of the day box. In the cubes are more things for Joshua and a few books/bibles. I'm not sure what to put in the bottom right cube because Joshua can reach it!
And here he is just because he's cute, and he happened to be standing there when I was taking pictures!
Sunday, July 28, 2013
Friday, July 26, 2013
Baby Girl Nursing Cover (Shower Gift)
This is a reversible nursing cover with a matching taggie blanket and burp cloth. It was a baby shower gift. It's always a bit odd asking someone if they are going to nurse and would like a cover, but I always find they are excited to have a cover if they are. I like to make them larger than the ones you can buy in the store, 38 inches wide by 30 inches long. If you want to make your own, see my post here.
The taggie blanket is really simple to make too. It's just 2 12 inch squares of fabric, with 5 inch ribbon loops. Lay one fabric square right side up. Fold your ribbon loops in half and pin to the square, make sure the raw edges are together (so the loop will be pointing to the center of the fabric not how this picture is) After all the loops are pinned, put your second piece of fabric on top and sew around the edges, leaving a space to turn it right side out. Once it's turned right side out, sew the hole closed and continue around the entire square to make it look nice. That's it!
Monday, July 22, 2013
Baby #4 is a Boy Cupcakes
Baby #4 is on HIS way! It's a Boy! In case you're counting, that's 3 boys and 1 girl. We're very excited about this new addition to our family.
I wanted a special way to tell the kids they were having a brother or sister, so I made cupcakes! It was my first time making cupcakes from scratch! (I always cheat and use a box.) I made little flags using tooth picks and construction paper, really simple. Then after our ultrasound, I stuck the right color flags in the cupcakes. Below is a picture of them (and our friends) as I came around the corner. Caleb and Rebekah both wanted a sister, so I think they weren't as excited as my friends kids were... That has changed already though, and now we're all trying to think of what to name this little guy.
Wednesday, July 17, 2013
Homemade Graham Crackers
Yep, you read that right. I actually made homemade graham crackers, and they are yummy! I've been trying hard to cut out all artificial dyes, flavors and preservatives. That junk is just not good for us! Rebekah said they were the best graham crackers she had ever tasted! I was surprised that they got crunchy, I figured they'd have the graham cracker taste but be soft. I did notice that the ones that were rolled thinner were crunchier.
I used a recipe from Smitten Kitchen. After making the dough and putting it in the refrigerator to chill, I read the rest of the recipe and realized that it was going to be A LOT of work. So, I decided to skip a lot of her chilling and decorating time. I just rolled them out and used a pizza cutter to cut squares. Seriously, why have I always been doing circle cookies! Making square ones with the pizza cutter was WAY easier than cookie cutters! I baked them right away instead of chilling them.
One thing I would change about the recipe is using a little less vanilla, maybe 1 1/2 Tbsp instead of 2. I thought it was a little strong.
Have you ever tried making your own crackers? I'd love to hear about it!
Tuesday, July 2, 2013
Another Little Girl's Skirt
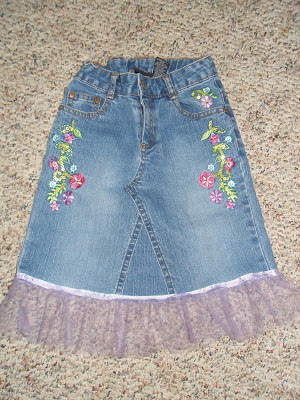
Someone gave me a pair of jeans for Rebekah with the cutest embroidery! I quickly turned them into a skirt, adding some tulle trim on the bottom. She loved the skirt and wore it to grandma and grandpa's house the next day. Unfortunately, the tulle couldn't hold up to her playing... Part of the tulle ripped off right away, I think she knelt on it. So, I cut the tulle off and left the purple ribbon, and it actually looks cuter now!
I also shortened a couple long skirts that she wouldn't wear because they were too long...
Subscribe to:
Comments (Atom)


