Tuesday, August 30, 2011

Baby Doll Skirt (and Matching Big Girl Skirt)


My daughter's 3rd birthday is coming up!  I decided to make her some new clothes with matching doll clothes (keep checking back for matching jumpers too).  I was surprised at how easy it was to make a little doll skirt.  First, I turned a pair of red pants (from Goodwill for $1.50) into a skirt for my daughter, the directions are here.  Once that skirt was finished, I noticed that I still had one pant leg left over.  Since it was already a tube shape like a skirt, all I had to do was add elastic and sew on that cute button (which was sewn to the tag of the pants as an extra).  In the picture below you can see the doll laying on top of the pant leg so I could measure where I needed to cut it. 


The next picture is how I precisely cut the elastic to the correct length.  To add the elastic to your skirt, just fold over the top about a 1/2 inch and sew a straight stitch all the way around exept for the last 2 inches.  To prevent fraying, you can zig zag stitch the edge before doing this step.  Thread your elastic through (I use a safety pin on one end of it to thread it easier).  Then sew the opening closed, piece of cake. 


I also had another pant leg left over from a different skirt I made for my daughter, so I made another one.  I think I might make a jean one too!  If you don't have a pant leg, you can do the same thing, but first make your own tube by sewing 2 pieces of fabric together, or one long one.


And here is the big skirt too, I apologize for the picture quality, it seems a little bright.

Saturday, August 27, 2011

Just Another Jean Skirt


This skirt was made from a pair of Goodwill Jeans ($5), and and old ripped pair of my husbands jeans.  I intended to turn this one into a maternity skirt.  I have a pair of khaki pants that won't make a good skirt, but has a great maternity waistband.  My plan was to put the maternity waistband on this skirt, but once the skirt was finished and I tried it on, I found that there is plenty of growing room for the moment.  So, I decided not to mess with a good thing.  If it gets tight in another month or two, then I will cut it up and attempt to add the maternity waistband.  If you missed my original tutorial on how to make a jean skirt out of a pair of jeans, click here.  

Wednesday, August 24, 2011

Maternity Shirt Makeovers


On this shirt I added a piece of black knit fabric to raise the neck line to a less revealing level .  I also added some elastic to the sides (see below).  The shirt seemed a little too tent-like, so I thought adding elastic on the sides would bring it in and make it a little more fitting.  It looks okay, I probably should have used smaller elastic, and I ended up having to use two pieces because it wasn't gathered enough.


This last shirt had a collar, which would make you think there would be buttons, but it was wide open.  Why do they make every maternity shirt low cut?  Back to the shirt.  I tried to sew button holes, but the fabric was too thick, so I just sewed it closed and then hand sewed three buttons on it.  I think it looks good now.  I have one more shirt that needs this button treatment, but I was tired of hand sewing buttons, it's my least favorite thing to do!

Tuesday, August 23, 2011

A Day in the Life

Starting school in a great mood!
I'm linking up with Heart of the Matter's Not Back to School Blog Hop again this week.  The theme is A Day in the Life, so here's our daily schedule (or at least what I hope it will be).


6:30  Kids get up and play
7:00  I get up (I got to sleep until 8 today though, yeah!)
7:30  Breakfast and I read my bible reading for the day
8:00  Kids play while I check email, blogs, etc.
8:30  Kids watch a movie while I take a shower, get ready, and clean (we use the table for school, so it has to be clean)
9:30  Start school with morning board (above photo), then on to our kindergarten curriculum, My Father's World.  We are learning about the Sun and the letter S.  (See pictures below)

Coloring and cutting our picture cards for the letter S.
Tactile activity: drawing the letter S in salt.
Cuisinaire Rods didn't go so well, you can see Rebekah starting to have a fit.
Just to keep it real, this is how we ended school today, screaming kids in time outs on separate couches.
 
 
11:00  Lunch
11:30  Free play, errands, visit the library, park, meet friends, etc.
1:00  Nap time (sometimes this is later)
4:00  Kids wake up (sometimes this is earlier)
5:00  Dinner, then whatever we have planned for the evening
8:30  Bed time (well, usually closer to 9)
10:00  Bed time for mommy and daddy


Wednesday, August 17, 2011

Maternity Dress to Shirt


I bought this plain, boring, kinda ugly gray dress from a thrift store for $6 (new with tags!) with the intent on altering it to make it a cute shirt.  I liked the color, and I loved the sleeves.  First of all, I cut off the bottom foot to make it a nice maternity length (one that will not become too short as my belly grows).  The picture below shows a close up of the bottom seam I did.  I hemmed it 2 inches with a double row of stitching to match the stitching on the sleeves.  And can you see the ugly ties in the first picture, they were very similar to show laces!  I used part of the bottom dress fabric to make new ties.  I ripped open the seam where the ties were (about an inch), took out old ones, replaced them with the new ones, then just sewed it closed.  The end result is still plain and maybe boring, but at least it's not ugly anymore.  I think it will look great with a black skirt and a black flower pin on the shirt, perfect for wearing to church. 


Front view:


Back view, notice the new ties: 

Monday, August 15, 2011

Morning Board for School

Good Morning!  I came across this homeschool site: Mama Jenn, and was inspired to create my own morning board (also called calendar boards).  I used Mama Jenn's blog for ideas, and printed out her templates for the date.  She also linked me to the weather chart and address sheet found at Confessions of a Homeschooler.  I love this weather chart because it uses pictures instead of my first chart that had words, which my kids couldn't read!  My favorite part is the obedience prayer and God's Standards.  We'll be reading them everyday to remind us of how God wants us to behave.  They came from Totally Tots, scroll down to the bottom to find them.  The today sign came from the dollar store.  I loved how Mama Jenn laminated all her pieces and used rings and hooks to make them all flip charts, but I didn't have the supplies to do that, and the thought of laminating all the pieces did not thrill me.  I just cut them out and put velcro dots on the back, hopefully the kids won't tear them up right away.  The did already tear up the baggies at the bottom for the extra pieces, and we haven't even officially used the poster in school yet!  Now I need to figure out a better way to store the pieces, any ideas???

Thursday, August 11, 2011

Ruffle Bottom Jean Skirt


This was a great skirt, but just a tad too short.  I fixed that by adding a ruffle to the bottom.  If you look really close, you can see my pen outline of the ruffle piece in the photo below.  I cut a piece of yarn the same length as the bottom (front) of the skirt.  Then I used that yarn to make an arc on a pair of jeans.  I drew perpendicular lines at each end to the correct length that I wanted my ruffle piece.  Then measured that same distance all along the arc, and connected the dots (or lines in my case).  I hope that made some sense!  If you have a larger piece of denim to work with, you can make the ruffle a bit fuller by making your first arc more curvy.  I made two ruffle pieces and then sewed them to the bottom of the skirt, sewed the side seams, and finished with a hem.  Very easy to do!  I hope my friend likes her longer skirt!

Wednesday, August 10, 2011

Scrapbook Pages


More scrapbook pages!  These are from the beginning of last summer.  I'm only a year behind in my scrapbooking, I may even finish 2010 before 2011 is over... or I'll start a baby book instead and get further behind...


The red block here is for more journaling, I just didn't have a dark colored pen when I was at my in-laws creating these pages.


This big square is also for more journaling (remember, no pen).

Monday, August 8, 2011

First Day of School


Today was our first day of Kindergarten!  We took a few pictures outside before we started.  We're using My Father's World curriculum this year, I think it's going to be great!  The first lesson today was about the first day of creation.  We learned that God created the light and the darkness, He called the light "day" and the darkness "night".  We will be making a creation banner and also a creation book, with pages for each day of creation.  


This is the banner, there are numbers to color, cut out, and glue on to our green banners.


This is the first page of our book.  They are both making a book.  They are gluing a black piece of paper to one side of the white one to make light and dark.  For a snack, we had duplex cookies, one vanilla and one chocolate.  


We are learning the hymn "My Father's World".  I found this beautiful rendition sung by Fernando Ortega, we will be watching this every day as we learn the song. 


To celebrate the beginning of the school year, we invited a friend out for ice cream after lunch!  Yum!


Even Rebekah got some, Italian ice is dairy free.  (She's mad at me in the picture because she doesn't want me to sit at the table with our friends...)

Sunday, August 7, 2011

Maternity Band


Guess what?  I'm pregnant!  Can you tell?  I am already into my second trimester, due in January!  This maternity band is the first of many maternity projects, not to mention baby stuff!  We'll be able to find out at the end of the month what gender our baby is, I am super excited.  I'm holding off on buying baby fabric until then.  The big projects that I'm planning are a diaper bag and recovering our car seat, but I'm sure I'll come up with others along the way.

Back to the maternity band, I found the pattern on my favorite blog: Make It & Love It.  I'm still having trouble sewing a stretchy seam on knit fabric, mine doesn't stretch enough.  I know I need to adjust the zig zag stitch somehow, but haven't figured out the best way yet.  I'm planning on making a black band too, so I'll update if it turns out better.  I used plain knit fabric from Hancocks, they seem to have better prices and a better selection that JoAnn's, and you can use a JoAnn's coupon too! 

Tuesday, August 2, 2011

Homeschool Space


I have spent the last several days getting ready to start homeschooling!  Caleb will be starting kindergarten!  The curriculum I chose is called My Father's World.  It's a bible based curriculum, with a very hands on approach.  We will be doing most of our school at the dining room table.  I have a large bookshelf in the dining room and am using the top 3 shelves to hold all of our stuff.  The bottom two shelves are for the kids books.


The above picture is the close up of the top shelf.  On the left are some random workbooks (the cheap dollar store variety), then boxes for our picture cards, a number cup, and our 100 cup.  Next is a box of random school stuff for me to use (like labels, note cards, etc.), followed by our butterfly garden, ant farm, and a number game. 


The middle shelf is for all of our art supplies!  The draws hold paint, stickers, glue, colored pencils, and other random craft things.  On top of them is construction paper, coloring books, and our textured letter puzzle.  On the left is a new bible (Hands on Bible), and our lap book binders (see picture below).  We will be using a folder for each letter, and creating a keepsake of all the work we do.  I'm sure you'll see pictures in the future.


Our last shelf has art sets, a letter book, new markers, their daily school boxes, and our tactile activities (beans, a salt tray, and letter cookie cutters).  


The other side of our patio door holds a day of the week sign and a weather chart.


This is my file box that houses all of our worksheets, flashcards, and teachers manual.  It currently lives under the computer desk and makes a nice footrest. 


An overall picture of our dining room.  Yes, that is what's left of my kids dinner on the table, and it's still sitting there while I type this!  I just learned a great tip today as well.  I can use dry erase markers or chalk markers on my patio door to transform it into a dry erase board!  I'm super excited about this because there is just no room to hang a white board in our school area.  So, tell me what you think!

Not Back to School Blog Hop

Rag Dolls (Like the Pioneers)


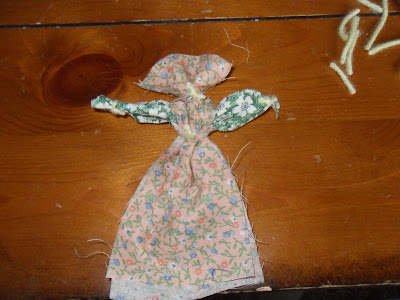
We went to a Pioneer Days Festival this weekend, and the kids learned how to make rag dolls.  They liked the one they made there, but wanted a whole family, so I pulled out my bags of scraps and we made families of dolls.  The family above is Caleb's, complete with a mom, dad, brother, and baby boy.  Rebekah's family is at the end, complete with a mom, dad, sister, and baby girl!  Scroll down to see how we made them.   Start with two scraps, the large one is approximately a foot long, by maybe 3 inches.  The second piece is about 1 inch by 4 inches.  Your pieces to do not have to be exact.  The bigger/smaller you make your pieces, the bigger/smaller your doll will be.  You will also need 4-6 pieces of yarn or string, about 4 inches long. 


Fold the large piece in half.


Gather the fabric together about 1 inch from the folded edge and tie a string around it.  Then trim the ends of the string.  


Lift up the top layer of fabric and place your small piece of fabric inside as shown.  Pull the top fabric back down, and tie a string around it to form the waist of your doll.  See next picture.


Tie a piece of sting on the end of each arm to form wrists.  Cut all the ends of the yarn, and you are finished with your girl doll.  To make a boy doll, keep reading.  


For a boy, cut a slit in the skirt to form legs as shown.  Tie a string on the ends of each leg to make ankles.


Your boy doll is finished.  


Rebekah's rag doll family:  

Related Posts Plugin for WordPress, Blogger...