Monday, October 31, 2011

Crocheted Flower Headband


I like to keep my ears warm in winter, but I hate how hats really mess up your hair!  It's been quite a long time since I've done any crocheting, but I found this adorable pattern at Hancocks for a flowered headband.  You can find the pattern here on Red Heart's website.  It was very easy to crochet, I think it took me 3 episodes of Extreme Home Makeover!  Even the flower was easy, although I did have to break out a book to refresh my memory of half double crochet and triple crochet.  I think I might make some more flowers just to put on hair clips.


 Tell me, do you like the new background?  I thought it could use a makeover.

Sunday, October 30, 2011

Randomness


This weekend Grandma came to visit us!  There was lots of joy while she was here, especially in doing puzzles.  Who knew my kids loved puzzles so much.  I think Caleb did this Cars puzzle at least 10 times, and Rebekah had a 24 piece Elmo puzzle that she did at least 10 times!

I also had the opportunity to teach a friend how to make a jean skirt out of old jeans.  She found two pairs at Goodwill for a grand total of $5, not bad for a long jean skirt.  It even has sparkles!


Lastly, here's a shirt I fixed for Rebekah.  It started as a onsie!  I don't know who thought it'd be a good idea to make a 4T onsie to go under a jumper.  Rebekah was not pleased and refused to wear the dress with the onsie, and I can't say I blame her.  I mean, how is she supposed to go potty when her shirt is buttoned between her legs???  A quick and simple fix, cut off the snaps and hem what's left.

Thursday, October 27, 2011

Black Maxi Skirt


I loved the gray maxi skirt I made (here) that I decided to make a black one too!  I know the picture isn't the best quality, but it looks great.  I adjusted my measurements and this one fits me much better.  I bought the black knit fabric at Hancock Fabric for $10 (2 yards at $5/yard), and the 2 inch wide elastic was about $2, plus tax my total was only $13!  Not bad for a nice black skirt.  The original tutorial came from Sew Much Ado, which is a great sewing blog you should check out if you haven't yet!

Monday, October 24, 2011

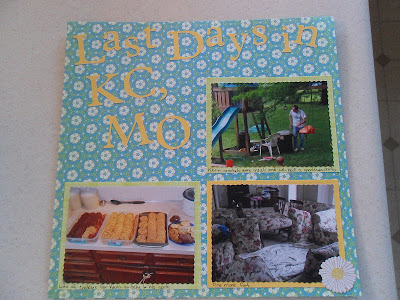
Last Days in KC, MO Scrapbook Pages


It was a little sad to look at the pictures of our last few days in Kansas City.  I miss the people we knew, and of course we had a lot of good memories in our house.  But we love our new home, new friends, new church, and our family that is much closer now!  I used my Cricut to cut the letters in the title, the Plantin Schoolbook cartridge.  The paper came from one of those paper packs that you can get at Micheal's or JoAnn's.  

Friday, October 21, 2011

Tt - Turtle Homeschool Highlights in MFW


This week was a pivotal week, we started reading (kinda).  This week we started to learn how to blend letters, and read our first word "sat".  Caleb was especially proud of his paper!


Our theme for the week was Tt - Turtle.  Our bible words were "I don't quit, I persevere!"  It was the perfect word to learn before beginning to read.  I've already been telling Caleb that he's going to have to persevere!

We also illustrated this poem that we found in the teacher's manual.  I was impressed that Caleb did it all himself (except for one arm of the man).


They finger painted turtles in the beginning of the week and then used them in our puppet show of "The Tortoise and the Hare".  The hare puppet came from First School


Our special snack was a marshmallow on top of a graham cracker, warmed in the microwave a tad.  Then we used candy corn to make a head and legs.  


The extra's in our lap books came from DLTK. I loved the Big T and Little t folders!


And lastly, all the books we read about turtles and perseverance.  Caleb really like Mike Mulligan's Steam Shovel.

Thursday, October 20, 2011

Scrapbook Fun


I bought this 4 pocket scrapbook page quite a while ago.  I made the one below right away to put in Rebekah's baby book, but I just now filled the back side of it with the pictures of all her homemade hair bows.  


I also had time yesterday to make a few more pages, these are of my sister-in-laws wedding.  I covered up most of their last name and wedding date so  you don't get the full effect, but I think they turned out really nice.


I wanted to include a lot of pictures without using too many pages, so these are mostly just pictures.


Monday, October 17, 2011

Teething Pads for my Ergo Baby Carrier


After trying several cheap baby carriers, a friend let me borrow her Ergo Baby Carrier and I fell in love. There is a wide belt that goes around your waist, and then it's like a backpack.  There is no fabric between you and the baby, their legs go around your waist.  The wide belt and wide padded straps means no back aches!  Here's my husband carrying Rebekah on his back last month.  She weighs 31 pounds and just turned 3 (although my son was a tank at that age and we wouldn't have been able to use it for him). 

 
Back to the teething pads, can you see the pink ones on the straps in the picture above?  They are to prevent the baby from chewing on the straps of you carrier.  Hopefully, Rebekah didn't chew on them this day, but she did when she was smaller!  So, I needed cute teething pads for a boy!Ergo baby sells them here, but for $14!  We spent enough money on the actual carrier, and I knew I could sew cheaper teething pads!

Let's get started.  You'll need two 5 1/2 inch strips of velcro and some fabric, flannel dinosaur fabric worked perfectly for me!  The inside is white terry cloth that I had left over from some other projects.  When I made the pink set, I cut up a flannel receiving blanket and a burp cloth that felt like a baby wash cloth.

Cut out two rectangles of both fabrics.  You'll have to measure your baby carrier to get the proper dimensions (you can make these for a non Ergo carrier too!).  My rectangles were 6 1/2 x 11. 


Sew your velcro onto the right side of each piece.  Make sure you sew the velcro on opposite ends of the rectangle as shown.


Pin your pieces right sides together and sew around the edge using a 1/2 inch seam allowance.  Make sure your velcro is on opposite ends of your rectangle.  Clip corners and turn it right side out. 


Top stitch around the entire rectangle, and you are done!  Repeat for the second teething pad.

Sunday, October 16, 2011

Apple Pie Filling for the Freezer


We have made a TON of applesauce (see here and here at the end of the post).  I though I'd try apple pie filling for the rest of the apples.  I followed this recipe: Freezing Apple Pie Filling, and it made 4 full bags (quart size).  I think it turned out great, and I should have enough filling in each bag to fill one big apple pie and two small ones for the kids.  I'd love to hear your recipes for desserts using apple pie filling though!

Friday, October 14, 2011

Thomas Birthday Cake


Caleb requested another Thomas birthday cake.  I wanted to do something a little more involved, but it was a busy week, so I just broke out the Wilton Thomas pan for the second year in a row.  See last years here.  When I was done frosting the cake, I let my kids use the extra frosting to fill the cake pan.  They had a blast, and were sad when they ran out of frosting.  Cake decorating lesson #1!


 I can't believe I have a 5 year old!

Thursday, October 13, 2011

A Love That Multiplies


I just finished this book and I found it truly inspiring!  There are a lot of helpful tips and just plain interesting facts about the Duggars, but the part that spoke to me is how Michelle relates to her children and how she encourages other mothers.  I admire her soft spoken attitude with her children, even when they are misbehaving.  She shares some sample dialogues of how she corrects her children, which has inspired me to attempt to do a better job in this area.  This scripture has been speaking to my heart the last few days:

Proverbs 15:1  A slow answer turneth away wrath, but greivous words stir up anger.

I do not want to stir up anger in my children, or my husband.  I need to be aware of the words I speak, and the tone of my voice as I say them.  I need to remember that my attitude sets the tone of my home, and I want it to be a happy one!

Michelle also shares a poem called Continue On by Roy Lessin (see below).  I never considered that my investments in my children and husband were an offering to God, an amazing revelation!

Continue On  by Roy Lessin

"A woman once fretted over the usefulness of her life.
She feared she was wasting her potential being a devoted wife and mother.
She wondered if the time and energy she invested in her husband and children would make a difference.
At times she got discouraged because so much of what she did seemed to go unnoticed and unappreciated.

Is it worth it? She often wondered.
Is there something better that I could be doing with my time?

It was during one of these moments of questioning
that she heard the still small voice of her heavenly Father speak to her heart.

You are a wife and mother because that is what I have called you to be.
Much of what you do is hidden from the public eye.
But I notice.
Most of what you give is done without remuneration.
But I am your reward.

Your husband cannot be the man I have called him to be
without your support.
Your influence upon him is greater than you think
and more powerful than you will ever know.
I bless him through your service and honor him through your love.

Your children are precious to Me.
Even more precious than they are to you.
I have entrusted them to your care and to raise for Me.
What you invest in them is an offering to Me.
You may never be in the public spotlight.
But your obedience shines as a bright light before Me.
Continue on. Remember you are My servant.
Do all to please Me."

Tuesday, October 11, 2011

Nn - Nest Homeschool Highlights in MFW


First of all, I am so thankful for this curriculum, My Father's World.  It has already been such a blessing to our family.  Not only are my children learning God's principles, but I am learning so much right along with them.  We all need to be reminded that we are lights to the world, that we need to live and grow in Jesus, and that we need to have the fruit of the Spirit working in our lives.  I now have the fruit of the Spirit memorized and have been praying about seeing more of them in my own life, as well as in my children.  How amazing this journey has been!  How awesome God is!

We just finished lesson 5, Nn Nest.  Our bible words for this week were "God takes good care of me".  We learned about bird nests, and other animal homes, and how God takes care of us like he takes care of all His creation.  Here we are gathering supplies to make our own bird nests out of grass clippings and mud.


We also made chocolate birds nest, with giant marshmallow eggs!


We start each day with our calendar, and then add a number to our 100 chart.  Here's Caleb counting our popsicle sticks, both kids have really learned how to count much better these past few weeks.  They get excited about counting, and several times a day I have to stop and listen to them count to whatever number is on their hearts.  In the car the other day Caleb counted to 72!  (with just a little help). 


Here we made trees with nest full of blue eggs.  We used torn pieces of paper for the leaves.


Here are our lap books this week, the Nancy N on the cover, the Animal Homes book, and the cards all came from DTLK.  Caleb is really getting good at his writing, and you can see that Rebekah likes to write the H on the end of her name!


Here are the books we read.  Today was literature day, and we read "Are You My Mother?"  My kids really liked the book, but then we tried to retell the story and make our own illustrations, which did not go well at all.  Oh well.  The weather has been gorgeous, so at least we were able to read outside a few days!

Remember our grapes from week 1?  They finally turned into raisins!  It took about 6 weeks, but they were in a windowsill that only got a few hours of afternoon sun, and they were inside the whole time.  The kids were sad that they couldn't eat them.

Monday, October 10, 2011

Bunk Bed Tent


I finally found something I could make for my son, Caleb!  I found this tutorial on a lemon squeezy home, but I followed it very loosely.  The blue fabric is actually a queen size sheet that I found at Goodwill that didn't fit on my bed like it was supposed to.  I bought 1 yard of rescue truck fabric from Hancock's to add some fun for my son.  Because our bunk bed has a full size bed on the bottom, I had to make the shape a little different than the tutorial's plain square one, but it wasn't hard at all.  I wish I would have made it a little longer though so it would fit better around the frame.  After cutting out the windows and door, I used bias tape around the blue sheet (you can see the green on the window), then I sewed a flap of rescue fabric to the top of the openings.  I added velcro to the door and windows so they can be left open.  For the ties, I used strips of fabric with velcro.  I think I may go back and add a few more ties, you can see that it's a little droopy, especially the window area.  My son loves it, and I was happy to make something special for him!

Related Posts Plugin for WordPress, Blogger...